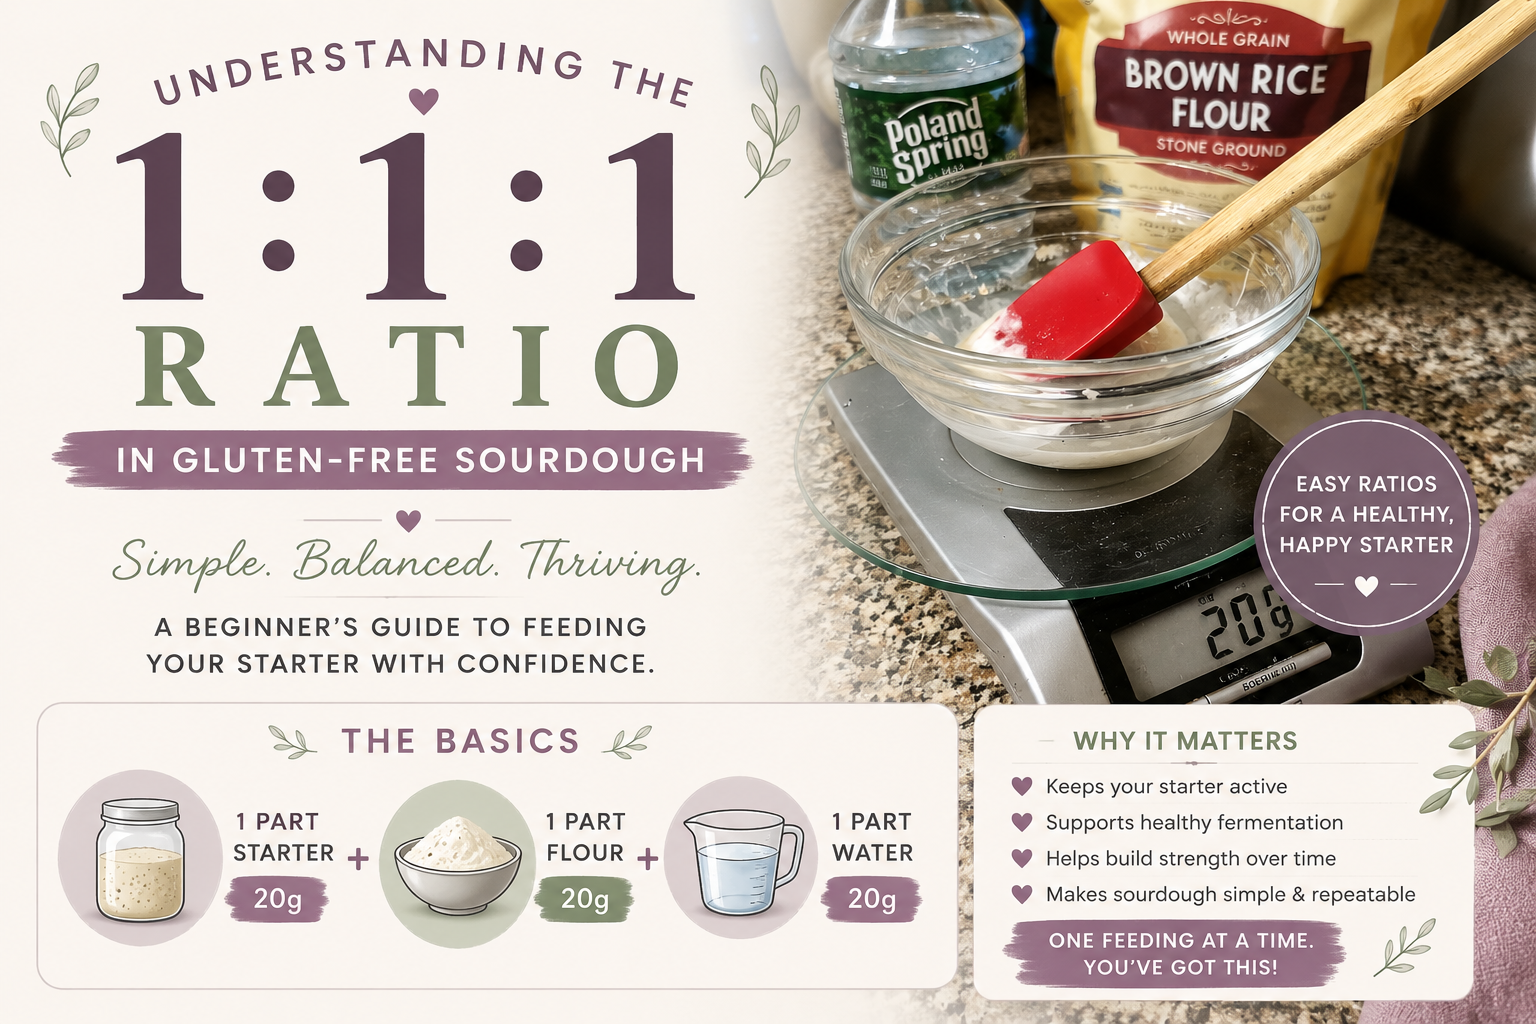
Understanding the 1:1:1 Ratio in Gluten-Free Sourdough
It’s much simpler than it sounds!
If you’ve spent any time researching gluten-free sourdough, chances are you’ve heard people talk about the “1:1:1 feeding ratio.”
And honestly? It can sound way more complicated than it really is.
A lot of beginner bakers see numbers and instantly think they need advanced math or special skills to keep a sourdough starter alive. But the truth is — the 1:1:1 ratio is actually one of the simplest and most helpful tools you can learn in gluten-free sourdough baking.
Once you understand it, feeding your starter becomes much less stressful.
So let’s break it down in a simple, real-life way.
What Does 1:1:1 Mean?
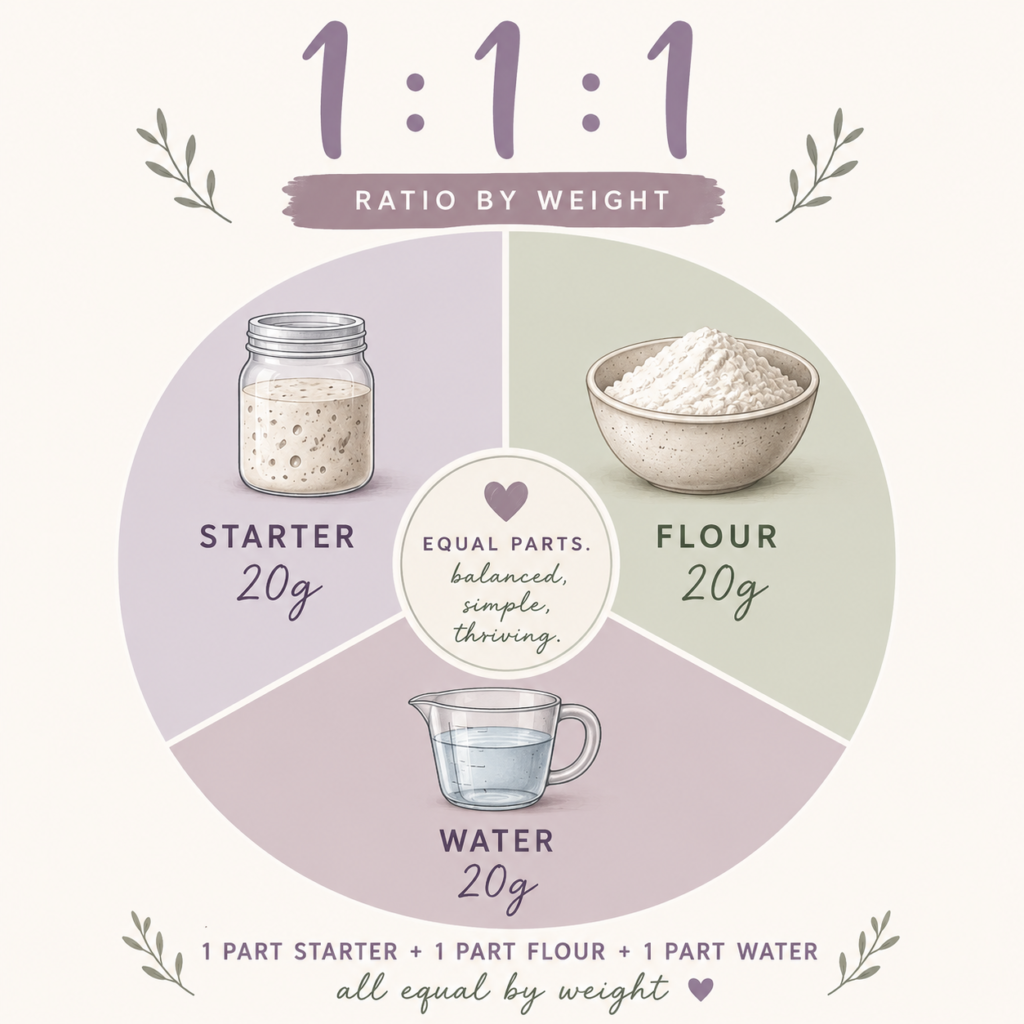
The 1:1:1 ratio means:
- 1 part starter
- 1 part flour
- 1 part water
By weight.
That last part matters a lot.
In gluten-free sourdough, ratios should always be measured using a kitchen scale — not measuring cups.
That’s because water and flour weigh very differently.
For example:
- 1/4 cup water weighs about 50g
- 1/4 cup gluten-free flour usually weighs around 25g
So even though the cups look equal, they are not actually equal feeding ratios.
This is one of the biggest mistakes beginners run into.
A Simple Example of a 1:1:1 Feeding
Here’s what a basic gluten-free sourdough feeding might look like:
- 20g starter
- 20g gluten-free flour
- 20g water
That’s it.
1:1:1 = 20g\ starter + 20g\ flour + 20g\ water
Mix it together well, scrape down the sides of the jar, loosely cover it, and let it rest in a warm spot.
Simple.
Why the 1:1:1 Ratio Matters
Your sourdough starter is alive.
Inside that jar are:
- wild yeast
- beneficial bacteria
- enzymes
- fermentation activity
When you feed your starter, you’re basically giving those microorganisms fresh food and water so they can continue growing and fermenting.
A balanced 1:1:1 feeding helps:
- keep your starter active
- maintain good fermentation
- prevent extreme acidity
- support consistent rise
- build strength over time
For beginners, it’s also one of the easiest ways to learn how your starter behaves.
Why Gluten-Free Starters Behave Differently
This is important:
Gluten-free sourdough does not behave exactly like traditional wheat sourdough.
A lot of online advice comes from wheat bakers — and sometimes that creates confusion for gluten-free beginners.
Gluten-free starters often:
- rise differently
- peak differently
- ferment faster or slower depending on flour blend
- have different textures
- show bubbles differently
Some gluten-free starters double.
Some only rise 50–75%.
Some become very airy without dramatic height.
And all of that can still be completely healthy.
That’s why learning your own starter matters more than chasing perfect social media photos.
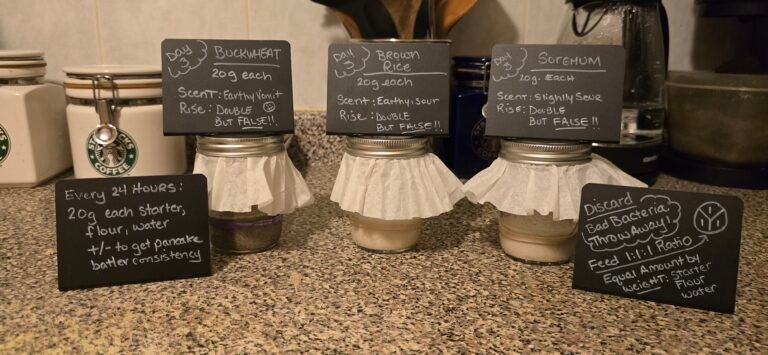
What Flour Should You Use?
There isn’t one “perfect” gluten-free flour for sourdough starter.
Many bakers successfully use:
- brown rice flour
- white rice flour
- sorghum flour
- buckwheat flour
- millet flour
- gluten-free flour blends
What matters most is:
- consistency
- hydration
- temperature
- regular feedings
Something to keep in mind – we have even more flour option than traditional starters.
And each of those flours can have slightly different profiles and needs.
Some flours ferment faster than others, and some absorb more water. That means your starter texture may change depending on the flour you use.
And that’s normal.
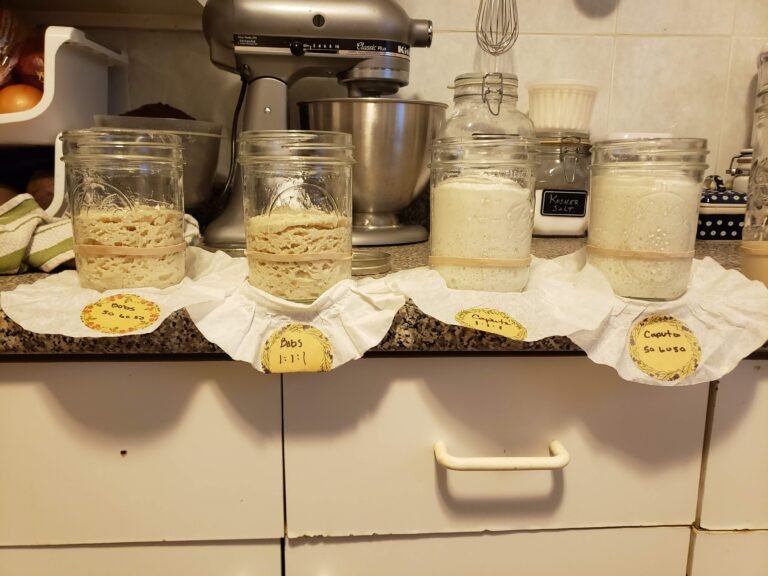
What Texture Should a Gluten-Free Starter Be?
Most gluten-free starters are thicker than wheat starters.
A healthy gluten-free starter is often:
- thick like pancake batter
- slightly sticky
- spreadable
- bubbly or “airy” after feeding
- pleasantly tangy over time
If it’s extremely dry, it may struggle to ferment properly.
If it’s extremely thin, it may rise and collapse too quickly.
Over time, you’ll learn what texture works best in your own kitchen.
How Often Should You Feed a Gluten-Free Starter?
For most active room-temperature starters, a good starting point is:
- Feed every 24 hours
- Keep the starter warm (around 75–82°F works is ideal)
During the early stages of building a starter, warmth can make a huge difference in activity.
Cold kitchens often slow fermentation dramatically, and opens the door to mold and bacteria to set in.
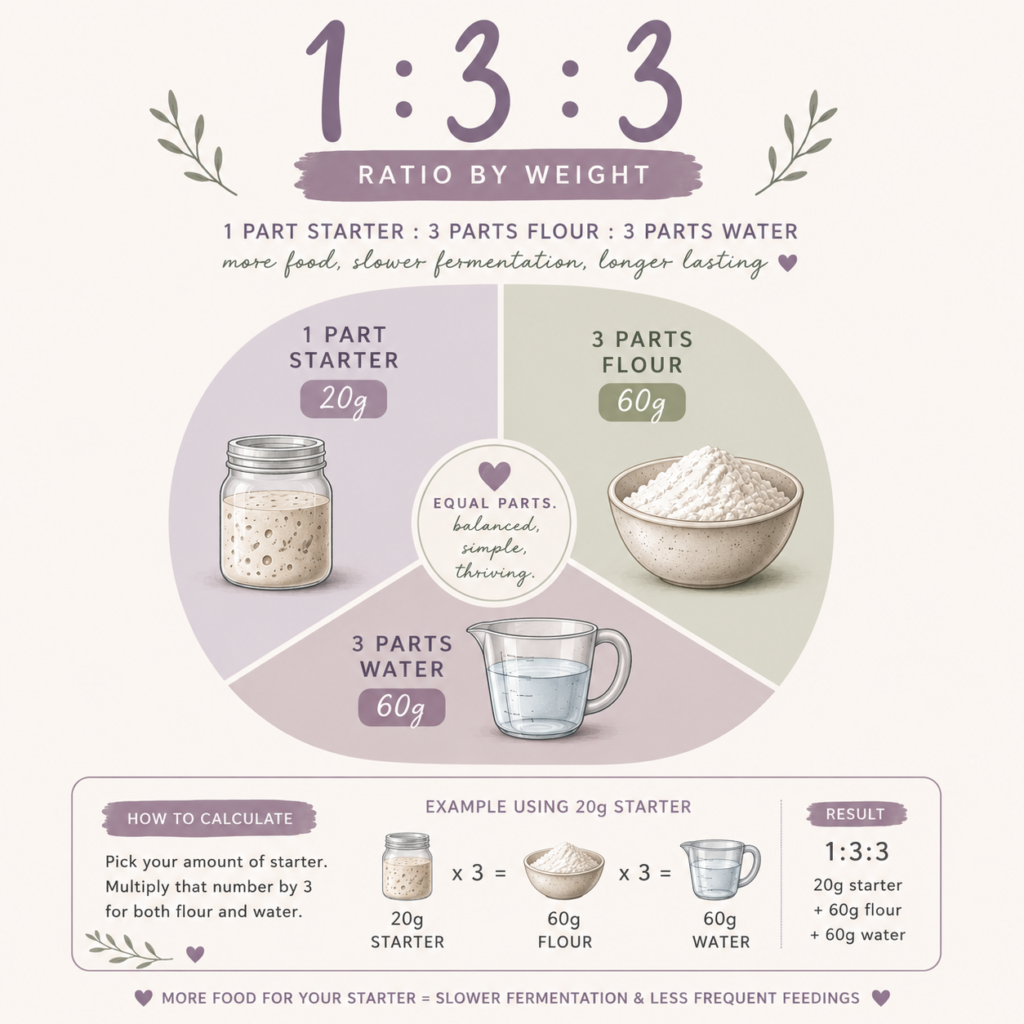
How to Calculate Other Feeding Ratios
You will see reference to other ratios for different situations. Once you understand the 1:1:1 ratio, learning other feeding ratios becomes much easier.
And don’t worry — the math is actually very simple.
The numbers just tell you how many “parts” of each ingredient to use.
The format is always:
- starter : flour : water
By weight.
Example – 1:3:3
A 1:3:3 ratio means:
- 1 part starter
- 3 parts flour
- 3 parts water
So if you start with 20g of starter:
- 20g starter
- 60g flour
- 60g water
1:3:3 = 20g\ starter + 60g\ flour + 60g\ water
Because:
- 3 × 20 = 60
That’s it.
Another Simple Example
If you had 10g starter and wanted a 1:2:2 feeding:
- 10g starter
- 20g flour
- 20g water
1:2:2 = 10g\ starter + 20g\ flour + 20g\ water
You simply multiply the flour and water by the second and third numbers in the ratio.
Why Would You Change Ratios?
Different feeding ratios can help control:
- fermentation speed
- acidity
- timing
- starter strength
For example:
1:1:1
Good for:
- regular daily feedings
- beginners
- establishing starters
- learning starter behavior
1:2:2 or 1:3:3
Good for:
- slowing fermentation down slightly
- feeding before overnight rises
- reducing excessive sourness
- giving the starter more food for longer periods (like prior to refrigerating for a week)
A larger feeding means the starter has more fresh flour and water available before it gets hungry again.
Common Beginner Mistakes With Feeding Ratios
Using Cups Instead of a Scale
This is probably the biggest issue.
Gluten-free sourdough is much more consistent when measured by grams.
This is because the flour is starchier and can settle.
1/2 cup one day could scoop out as 1/4 cup the next.
A cheap digital kitchen scale can completely change your results.
Feeding Too Much Starter
If you keep increasing the starter amount without adjusting flour and water, your microorganisms can run out of food quickly.
That can lead to:
- sharp smells
- weak rise
- excess acidity
- sluggish fermentation
Expecting Gluten-Free Starter to Look Like Wheat Starter
This one causes so much unnecessary frustration.
Your gluten-free starter does not need to look exactly like a wheat starter to be healthy.
Different flour blends behave differently.
Focus on:
- air pockets or bubbles (your choice of flour affects how the gas pockets appear)
- scent
- activity
- consistency
- fermentation timing
Not perfection.
Signs Your Starter Is Healthy
Once established, a healthy gluten-free sourdough starter may:
- smell pleasantly tangy
- have visible bubbles
- expand after feeding
- develop a fluffy or airy texture
- peak and slowly fall over time
It may smell:
- yeasty
- mildly sour
- slightly sweet
- like yogurt or fruit at times
And yes — sometimes early starters smell weird before they stabilize. That’s part of the process too.
Final Thoughts
The 1:1:1 ratio is not about perfection.
It’s simply a balanced way to feed and strengthen your gluten-free sourdough starter.
Learning sourdough gets a lot less overwhelming once you stop trying to memorize rigid rules and start learning how your starter behaves.
Because gluten-free sourdough is flexible.
Different kitchens. Different flours. Different climates. Different starters.
The goal isn’t to make your starter look exactly like someone else’s.
The goal is to understand what healthy fermentation looks like in your own kitchen — one feeding at a time.
Slow baking. Steady growth. Full hearts – Keep Feeding What Matters!

")
")

")